NOTE: Creating these mods (and maps and scenarios) is, for the most part, fairly straightforward because Panther supplies the tools and documentation with the game. Plus, at the HTTR forums, there is a scenario and mod message board where the creators promptly answer questions.
I last talked about how I created the tile using the existing "broken" (meaning broken ground) terrain tile that I felt could be sacrificed in my maps. I addressed the kinds of values I entered into the dialog box to get the effect I wanted, which determines the mechanics of the terrain elements: visibility, movement, and the effect of shell bursts. For this mod I'm also developing new terrain graphics, so the following are some things I learned that may be of help to others.
To give the map the look of the Normandy hedgerows, I've created a series of grids for the different zoom levels of the games. It was a trial and error process figuring out which tiles correspond to which zoom levels, but here for any other aspiring modders is the relationship:

I was quite happy with how the graphic looked initially, but Arjuna from Panther games pointed out that the field density might be a bit high for the zoom level. Good point. So, I created new tiles for the more "zoomed-in" levels, which, after some experimentation, I decided look best as a straight up and down grid. I'm not 100% happy with it yet, but the grid at least doesn't overwhelm the map - and it does its job, giving the player an idea of when they are in the hedgerows.
I also made the tile graphics two-toned so that they would show up at any elevation. The trick was to introduce a dark brown row of pixels next to the green, as seen (barely) below:

For those of you that want to create new terrain graphics - it's important to make a corresponding set of grayscale graphics on the second map interface called "MapPatA.bmp".
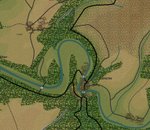
Here's how the most magnified zoom level looks:

Anyway – that’s all for now. Next post is part three of terrain were I toss in a couple of “wish list” items for this kind of work.
2 comments:
Hi Rooster, this is the only way I can ask you a question. In the HTTR forum dated 9.3.04 you show an establishment format. Did you produce this? If so, what program did you use? Where can I get a copy?
cheers
Rubber Sword
g.davidrose@tesco.net
Hey Rubber Sword -
That image is a screenshot from the AA:HTTR Scenario Maker software, which ships with the game.
Rooster
Post a Comment